")
Your garage door is likely the largest moving component in your home and often one of the most frequently used. From storing your car to serving as a workshop or even a secondary entryway, your garage plays an essential role in daily life. At Alpine Garage Doors Texas, we’ve seen countless instances where a bit of preventative maintenance could have spared homeowners major inconvenience, costly repairs, or even safety hazards. That’s why garage door maintenance is something every homeowner should prioritize; it’s your first line of defense against unexpected breakdowns and hazards.
Take the case of Mr. Jenkins in Atascocita, TX. He called us because his garage door had become so noisy and sluggish that it woke the whole house every morning. The issue? Years of ignored maintenance had led to rusted rollers, misaligned tracks, and a failing garage door opener. A routine inspection and some simple DIY maintenance could have prevented all of it.
According to the Family Handyman and other industry experts, garage doors are often neglected when it comes to regular maintenance. Over 70% of homeowners don’t conduct routine checks, yet their garage doors open and close thousands of times each year. This article offers a comprehensive step-by-step guide to garage door maintenance, ensuring safe, smooth operation and extending the life of your garage door system.
Why Garage Door Maintenance Is Essential
Garage doors are made up of dozens of parts, including springs, cables, tracks, rollers, and hinges. When even one component fails, the entire system can be compromised. Regular garage door maintenance prevents sudden failures and ensures the longevity of each moving part. It also helps identify early signs of wear, rust, or misalignment before they escalate into major issues. Preventive maintenance is significantly more cost-effective than emergency repairs or full system replacements.
Neglecting your garage door can lead to:
- Snapped torsion springs, which can be dangerous and costly
- Stuck or misaligned garage door tracks that interfere with smooth operation
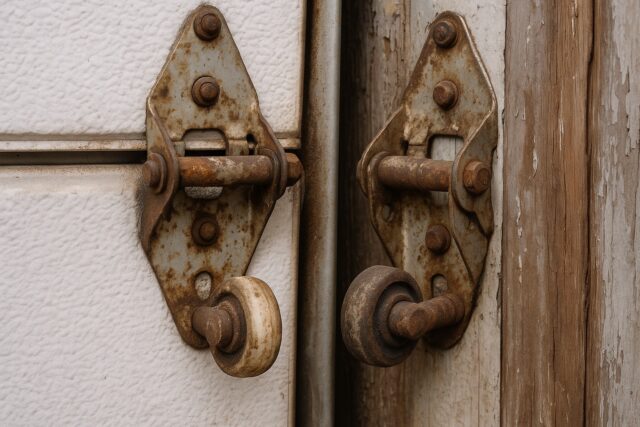
- Worn-out garage door rollers and hinges, causing a loud noise and inefficient movement
- Faulty auto-reverse safety features that fail to protect your family or pets
- Damage to your garage door opener or arm bar, leading to expensive replacements
Consistent upkeep not only protects your family and property but also maintains quiet operation, extends the lifespan of your garage door system, and supports your home’s energy efficiency. Routine maintenance also ensures all the safety features function properly, which is essential in homes with children and pets.
Safety First: What You Should Do Before Starting
1. Disconnect Power
If your garage door has an automatic opener, the first step is to unplug it from its power source to avoid accidental activation. Use the release handle to disengage the door. This isolates the motor and ensures that the garage door remains stationary while you work on it.
2. Secure the Door
Always make sure the door is in the closed position before starting any maintenance tasks. This reduces the risk of injury from falling components, especially if working around torsion springs or roller brackets. If you’re working on the inside, brace the door to keep it stable.
3. Use Protective Gear
Wear safety glasses and gloves to protect yourself from grease, rust, and sharp metal parts. Proper attire helps protect against any flying debris or mishandled tools.
4. Know When to Call a Pro
Some maintenance tasks, like adjusting torsion springs or replacing a snapped cable, should only be done by trained technicians. These components are under high tension and can cause serious injury. Recognizing your limits is part of safe DIY work.
Essential Tools and Materials
To perform effective DIY garage door maintenance, gather the following:
- Socket wrench or ratchet set for tightening bolts
- Flathead screwdriver for adjustments
- Spray lubricant (preferably white lithium grease or garage door lubricant)
- Cloth or microfiber rags for cleaning and wiping off excess grease
- Step ladder to access elevated components like torsion springs and top rails
- Mild detergent and water for cleaning panels and tracks
- Flashlight to inspect darker or enclosed areas of the door system
Having the right tools on hand not only makes the job more efficient but also prevents accidental damage to sensitive components like rollers or hinges. Always inspect your tools before starting to ensure they are in good condition and safe to use.
Avoid using all-purpose lubricants like WD-40, which can strip away protective grease. Instead, opt for a garage-specific lubricant that reduces friction while protecting against rust and corrosion.
Step 1: Conduct a Visual Inspection
Walk around and inspect every part of the garage door system. Look closely at:
- Garage door springs for gaps, cracks, or visible rust
- Garage door tracks to ensure they are properly aligned, free of dents or obstructions
- Garage door rollers for chipping, cracking, or imbalance
- Cables and arm bars for signs of fraying, corrosion, or slackness
- Weatherstripping to ensure tight seals with no tears, hardening, or detachment
- Roller brackets and hinges to confirm they are securely fastened and not bent or warped
Use a flashlight for a better view of hidden or shaded components. Mark any issues for further attention or professional service.
Step 2: Clean the Tracks and Panels
Use a damp rag to wipe down the garage door tracks, removing dirt and debris. For tough grime, apply a mild detergent and scrub gently with a soft brush. Once clean, use a dry cloth to wipe off any moisture.
For the door itself:
- Wash panels with soap and water, focusing on the bottom section where splashed dirt accumulates
- Remove any rust spots or signs of water damage, especially on steel or wood doors
- Use a weather-resistant sealant for added protection on wood doors
- Inspect for paint damage or chipped areas that might allow moisture intrusion
Remember: never lubricate the tracks, as this attracts more dust and debris.
Step 3: Lubricate All Moving Parts
This is one of the most important garage door maintenance tasks. Lubrication ensures quiet operation and reduces wear.
Spray a small amount of white lithium grease or a dedicated garage door lubricant on:
- Hinges, especially where they pivot
- Rollers (except sealed or nylon-covered ones)
- Springs (apply lightly to avoid dripping and attracting dust)
- Bearings and end plates
- Pulleys, arm bars, and metal pivot points
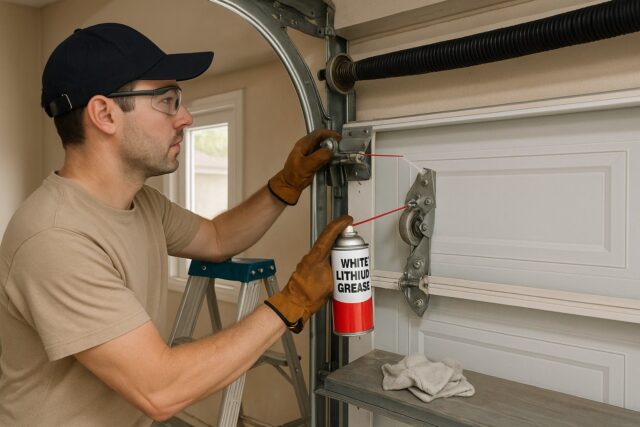
Wipe away excess grease with a rag. Avoid spraying lubricant directly on plastic parts, belts, or safety sensors.
Step 4: Tighten Hardware and Bolts
Garage doors go through thousands of cycles each year. Over time, vibration loosens bolts and nuts.
Use a socket wrench to:
- Tighten loose nuts on roller brackets, hinges, and mounting plates
- Secure bolts on the garage door opener and its mounting frame
- Check for any missing or severely rusted hardware and replace as needed
Be careful not to overtighten, especially on aluminum or thin metal parts. This can strip threads or damage the integrity of the hardware.
Step 5: Test Door Balance
An unbalanced door puts pressure on your garage door opener and reduces its lifespan. An unbalanced door may also be harder to lift manually and may not close evenly.
To test:
- Disconnect the automatic opener using the release handle.
- Manually lift the door halfway.
- If it stays in place without rising or falling, it’s balanced.
- If it drops or shoots up, the torsion springs may be damaged or out of alignment.
A professional technician should inspect and correct balance issues.
Step 6: Test the Auto-Reverse Safety Feature
Safety features are critical for protecting pets, children, and vehicles.
Test 1: Mechanical Auto-Reverse
- Place a brick or 2×4 under the open door.
- Close the door.
- It should automatically reverse when it contacts the object.
Test 2: Photoelectric Sensors
- Close the door and wave an object (like a broomstick) in front of the sensors.
- The door should stop and reverse direction.
Clean the sensors with a soft cloth and realign them as needed. If tests fail, schedule a service call.
Step 7: Inspect Weatherstripping
Weatherstripping helps with energy efficiency and keeps out pests and moisture. Damaged weather seals can let in cold air, rainwater, and even small animals.
Check:
- Bottom seal for cracks, brittleness, or hardening
- Top and side seals for gaps or sagging
- Ensure all seals are securely attached with no visible daylight between them and the frame
Replace with garage-specific weather stripping if any part appears damaged. Use sealant or screws to secure them firmly.
Step 8: Check Garage Door Opener and Remote
Inspect the garage door opener system:
- Replace the remote control batteries
- Clean and inspect the top rail and drive carriage
- Test features like battery backup and Stealth Drive Connect, or smart garage systems
- Listen for odd noises such as grinding, which can indicate worn gears or poor lubrication
Review your manufacturer’s manual to determine if chain or belt tension needs adjusting. Avoid over-tightening as it can damage the motor.
Step 9: Refresh the Door’s Appearance
A well-maintained door adds to curb appeal and home value.
- Wash the door exterior with a pressure hose and mild detergent
- Touch up rust spots or peeling paint with appropriate primer and finish
- Apply weather sealant to wood doors to prevent warping and water damage
- Repaint or re-stain panels if necessary using high-durability outdoor coatings
Don’t forget to clean decorative hardware and glass windows, if your door has them.
Step 10: Create a Seasonal Maintenance Plan
Break down your garage door maintenance tasks by season:
Spring:
- Deep clean garage door panels and tracks
- Lubricate hinges, rollers, and springs
- Test balance and auto-reverse
- Inspect for water damage from the winter months
Summer:
- Inspect cables, pulleys, and hardware for signs of wear
- Clean and align photo sensors
- Touch up paint to prevent rust
- Check for sagging panels due to heat expansion
Fall:
- Check weatherstripping and seals
- Inspect the opener battery backup and smart features
- Lubricate all moving parts thoroughly in preparation for colder weather
- Examine hinges and roller brackets
Winter:
- Clear ice and debris from the tracks and the bottom seal
- Tighten bolts and brackets that may have loosened due to temperature shifts
- Test the garage door opener operation multiple times in cold conditions
- Vacuum around sensors to remove cobwebs or dust
Use a DIY guide or set calendar reminders to stay consistent with your seasonal tasks.
When to Call in the Pros
If you encounter any of the following, stop and call a professional garage door service:
- Broken or loose torsion springs
- Snapped cables or rollers off track
- Motor failure in the garage door opener
- Door that won’t open, close, or respond to remotes
- Loud grinding, clanking, or screeching sounds
- Bent or detached garage door tracks
Attempting to fix these high-tension or motorized components without the right experience can cause further damage or serious injury. A licensed technician can quickly diagnose the problem and ensure that every part of your system operates safely and efficiently.
These situations require specialized tools and training. For the safety of your family, don’t attempt these repairs yourself. Trust trained technicians to restore your system’s full functionality.
Final Thoughts
Performing regular garage door maintenance can seem overwhelming, but when broken into simple steps, it becomes a manageable and rewarding DIY project. By inspecting your system, applying the right garage door lubricant, tightening loose bolts, and testing safety features, you can ensure smooth and quiet operation for years to come.
Routine maintenance is about more than keeping your garage door functional. It’s about safety, savings, and extending the life of your investment. Your garage protects your vehicle, tools, and often serves as a gateway to your home. Giving it a little attention a few times a year goes a long way.
Keep a checklist handy, involve your family, and schedule reminders. And when in doubt, Alpine Garage Doors Texas is just a call away.
How Can Alpine Garage Doors Texas Help You?
Based in Houston and proudly serving Atascocita, Humble, and the surrounding areas, Alpine Garage Doors Texas is your trusted local expert for all things garage doors.
Whether you need help with garage door springs, opener issues, track repairs, or routine maintenance services, our trained technicians are ready to assist.
We work with residential and commercial clients and specialize in:
- Emergency garage door repairs
- Garage door opener replacements
- Annual maintenance and safety checks
- Custom garage door installations
Let us help you keep your garage safe, efficient, and beautiful.
📍 Address: 638 Saddle Rock Dr, Houston, TX 77037
📞 Phone: 346-438-1138
📄 Website: alpinegaragedoorstx.com
Call us today or book your service online. Experience professional service with a local touch.
Frequently Asked Questions (FAQs)
1. How long does a garage door typically last with regular maintenance?
A well-maintained garage door can last 15 to 30 years, depending on material quality, climate, and usage.
2. Can I use motor oil or general-purpose grease on my garage door parts?
No, you should always use white lithium grease or a garage door-specific lubricant to prevent buildup and ensure smooth movement.
3. Why is my garage door making a popping or snapping noise?
Popping noises often come from dry rollers or misaligned tracks and may indicate parts need lubrication or tightening.
4. How do I know if my garage door opener needs to be replaced?
If your opener is over 10-15 years old, makes grinding noises, or struggles to lift the door consistently, it may be time for a replacement.